How To Install Sentrol Magnetic Contact Series 2302-2304
Edwards Signaling 12th Dec 2022
How To Install Magnetic Contact Series 2302-2304
Mounting / Installation
Close the door. Adjust the interlocking bracket into the appropriate slot in the switch housing to fit the specific curtain door channel. Place the unit on the channel, making sure the outer lip of the switch housing is positioned so it overlaps the edge of the channel. See Figure 1 for proper mounting.
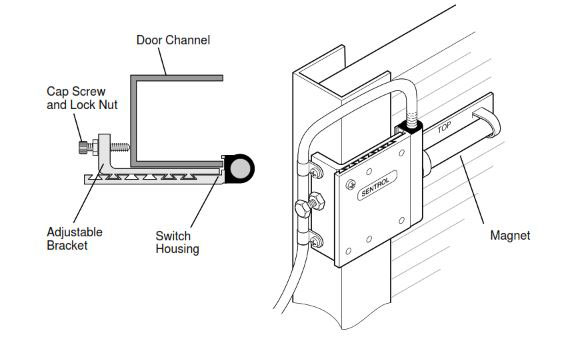
Figure 1. Mounting
Move the switch and bracket assembly so that it is no more than 48" from the surface of the floor. This will allow the magnet to roll up with the door without interference.
Tighten down the mounting bolt enough to hold the unit in place.
For ease of adjustment place a #8 self-tapping screw (provided) in the appropriate mounting hole to lock switch and bracket housings together.
Position the magnet so that the word TOP is reading in the same direction as the Sentrol label on the switch housing, and the center line of the magnet is aligned with the Sentrol label on the switch housing. The magnet end should be within 1/4" to 1/2" from the edge of the switch housing for reliable actuation on heavy steel surfaces. Make sure the magnet housing is centered within the channel or slat of the door.
Connect the switch to the multimeter to verify functioning. Push firmly on the door so that the area the magnet occupies is moved to its farthest position away from the switch in all directions. If the circuit is interrupted slide the magnet closer to the switch assembly. Repeat the above procedures to ensure proper operation. Mark this position on the door.
Once the correct positioning is established, tighten the mounting bolt down and then tighten the lock nut against the housing. For extra mounting strength, drill two .156" dia. holes through the mounting holes in the housing and fasten with two #8 screws (not provided).
To mount the magnet, drill two 0.156" dia. holes though the mounting holes in the magnet housing. Fasten down with two #8 self tapping screws (provided). For faster installation remove the magnet. Clean the door surface with an alcohol pad. Dry the area off and mount with the strips of double stick adhesive tape. Mount the tape to the magnet housing first and then attach the housing to the door, pressing firmly to ensure proper adhesion.
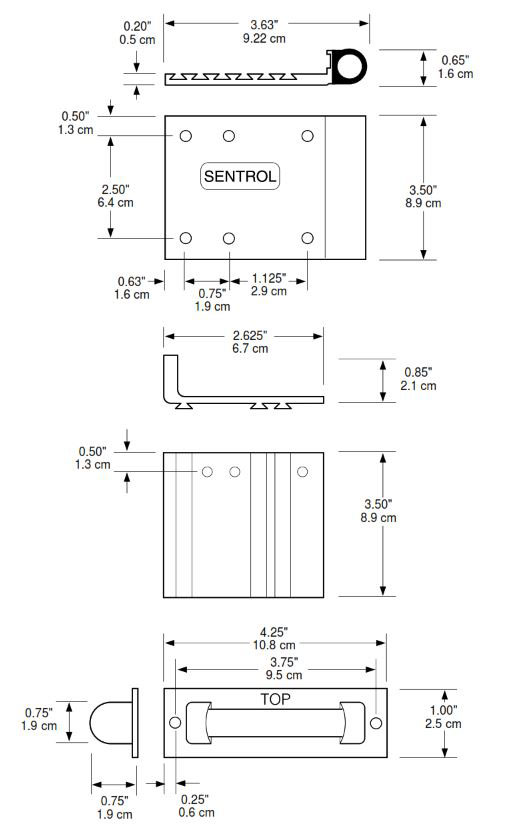
Figure 2. Dimensions
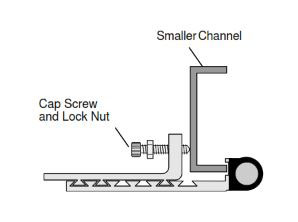
Figure 3. Alternate Configuration
Specifications
The contact shall be a hermetically sealed reed switch nominally 3.6" L x 3.5" H x .65" D with actuating magnet. Each switch housing has two sets of mounting holes that shall be on 2 1/2" centers. Contact and magnet shall be in brushed extruded aluminum type housing. Contact shall be sealed in Sentrol's exclusive polyurethane potting compound. Mounting brackets shall be furnished with contact. Contacts shall be specified as Sentrol part numbers 2302 and 2304.
Form A* (2302)
Voltage .............................................................. 100 V AC/DC max.
Current ............................................................................. 0.5 A max.
Power .............................................................................. 7.5 W max.
Form C (2304)
Voltage ................................................................ 30 V AC/DC max.
Current ........................................................................... 0.25 A max.
Power .............................................................................. 3.0 W max.
*European union specification 48V AC/DC
Ordering Information
| Model Number | Loop Type | Electrical Configuration | Gap Distance (Make)* | Lead Type | Listing |
|---|---|---|---|---|---|
| 2302A | Closed | N.O. | Up to 3" | 2' stainless steel armored cable | UL |
| 2304A | Open or Closed | S.P.D.T. | Up to 3" | 2' stainless steel armored cable | UL |
NOTE: Gap distances are nominal make distance ±20%. Gap specifications are for switch to make. Break distance is approximately 1.1 to 1.5 times make.
12th Dec 2022
